AUS
AUS USA
USA


.jpg)


The Complete Guide to Setting Up Tubeless Tires for Road and Mountain Bikes
Tubeless tires have revolutionized the cycling world, offering numerous advantages for both mountain biking and road cycling enthusiasts. Not only do they provide a smoother ride and increased resistance to flats, but they also allow riders to run lower air pressure for enhanced performance. However, setting up tubeless tires can be a daunting task without proper guidance. In this comprehensive guide, we will walk you through every aspect of the tubeless setup process. From the essential tools and materials you'll need to step-by-step instructions, we've got you covered. Let's dive in!
Tools and Materials:
Regardless of whether you're hitting the trails or the road, there are a few tools and materials that you should have on hand for a successful tubeless setup. Gather a Pump, two tire levers, scissors, a pick, and the tools required to remove and install your bike's wheels. Additionally, make sure to have Tubeless Tape, Tubeless Valve Stems and Tubeless Sealant. It's also a good idea to have isopropyl alcohol and a rag for prepping the taping surface. Now that we have everything we need, let's get started.
(2).png?tr=w-347,h-214)
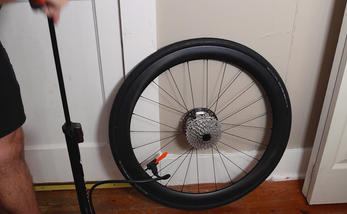
1. Remove one wheel from your bike and release all the air from the inner tube inside the tire.
.png?tr=w-347,h-214)
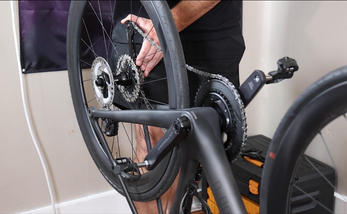
2. Push the entire bead of the tire inwards towards the center of the rim on both sides to facilitate tire removal.
.png?tr=w-347,h-214)
3. Use one tire lever to pull the tire bead over the rim, utilizing a spoke hook if available. Then, insert the second tire lever under the tire bead and work your way around the tire, releasing one side of the tire from the wheel.
.png?tr=w-347,h-214)
4. Remove the inner tube. If your wheels are tubeless-ready, you can skip this step. Otherwise, remove any existing rim strip, if applicable, and clean the rim surface with isopropyl alcohol and a rag.
.png?tr=w-347,h-214)
5. Apply tubeless tape to the rim, starting opposite the valve hole and overlapping the tape a few inches to ensure a secure seal.
.png?tr=w-347,h-214)
6. Carefully poke the tape at the valve hole with a pick and insert the tubeless valve stem. Apply pressure with one hand while threading on the lockring with the other hand to ensure a tight seal.
.png?tr=w-347,h-214)
7. Mount the tire back on the rim, paying attention to the tire's direction and aligning any logos with the valve stem. Use your hands to mount the tire as much as possible, resorting to tire levers only if necessary.
.png?tr=w-347,h-214)
8. Before fully mounting the tire, pour the recommended amount of sealant inside. The sealant will fill imperfections and seal small punctures during your rides.
.png?tr=w-347,h-214)
9. Inflate the tire until it is fully seated on the rim. In some cases, using a compressor might be necessary for stubborn tires.
10. Continue inflating the tire to the maximum pressure specified on the tire to ensure proper sealing.
.png?tr=w-347,h-214)
11. Shake the wheel vigorously to distribute the sealant evenly inside the tire.
12. Apply tubeless tape to the rim, starting opposite the valve hole and overlapping the tape a few inches to ensure a secure seal.
Maintenance Tips:
To ensure optimal performance and longevity of your tubeless setup, consider these maintenance tips:
- Always check tire pressure before each ride, as air can slowly escape over time.
- Regularly monitor the condition of the sealant and add more as needed. It's recommended to remove the old sealant before adding new sealant to prevent unnecessary weight gain in the tire.
- Keep a puncture kit or spare tube handy for situations where the sealant cannot address larger punctures. Being prepared can save you from a potentially frustrating situation on your ride.
- By following this comprehensive guide, you can confidently set up tubeless tires for your road or mountain bike. The benefits of tubeless setups, such as a smoother ride, increased puncture resistance, and enhanced performance, make the effort well worth it. Remember to gather the necessary tools and materials, carefully follow the step-by-step instructions, and prioritize regular maintenance to enjoy the advantages of tubeless tires. Happy riding!
Conclusion:
By following this comprehensive guide, you can confidently set up tubeless tires for your road or mountain bike. The benefits of tubeless setups, such as a smoother ride, increased puncture resistance, and enhanced performance, make the effort well worth it. Remember to gather the necessary tools and materials, carefully follow the step-by-step instructions, and prioritize regular maintenance to enjoy the advantages of tubeless tires. Happy riding!