AUS
AUS USA
USA


.jpg)


In our previous articles, we have looked at how to set your suspension up and a few basic terms. Now, we’ll want to look at keeping your suspension working and how to get the best from it. All of this work is fairly easy but will be time-consuming to do it correctly.
Look after your stanchions
![]()
Your stanchions are the cool bit on your fork legs. They are the bit that has probably been anodised a cool colour and feel slippery to the touch. The problem is if you don’t look after them, they can slowly get ruined by dirt being stuck under or around the seals. As this happens, you’ll feel a sticky feeling in your fork.
You might hear on forums not to worry as you can get your stanchions re-coated or you can sort them with a bit of nail varnish. The advice here is wrong, you can buy new stanchions though, but they come as a pair attached to your fork’s crown. Having to do this is not cheap.
We don’t, and you don’t want to get to that point. Taking a bit of time and care will save you a lot of money in the long run. The easy bit is to always wash your bike down after a ride, and don’t ever leave mud on it. Then we’ll want to clean your fork seals correctly, under no circumstances should you use WD-40.
Clean the dirt from your fork wipers

You’ll need a few things to do this.
- Bike cleaner
- A soft cloth
- A cotton bud
- Shock lower lube kit
Firstly you’ll want to have washed off the mud from your bike. Your forks should be looking clean here. Now you’ll want to take your lower lube kit, which will preferably not be one of the spray ones, drop a few bits of the lube around your forks wipers, the rubber bit at the bottom of the stanchions.
Wait a few minutes, now push down on your handlebars, with your suspension open, and then lot your forks come back up. You should see some dirt on the stanchions. Take your soft cloth and remove that dirt.
Now grab your cotton bud and start to work it around the wiper and you should get a black cotton bud after doing this. Repeat this a few times, always making sure to wipe away the dirt. Now take your bike cleaner and wash the stanchions and wipers. Then use the soft cloth to remove any dirt that didn’t wash off.
What about the rear shock?
The technique also works well on your rear shock. Depending on the style of shock you have you may need to turn the bike upside down when putting the lube on as gravity may take it away from the wipers otherwise. It will also be easier to cycle the shock by sitting on and then getting off the bike compared to pushing down on the bars like above.
Performing a lower lube service on your forks
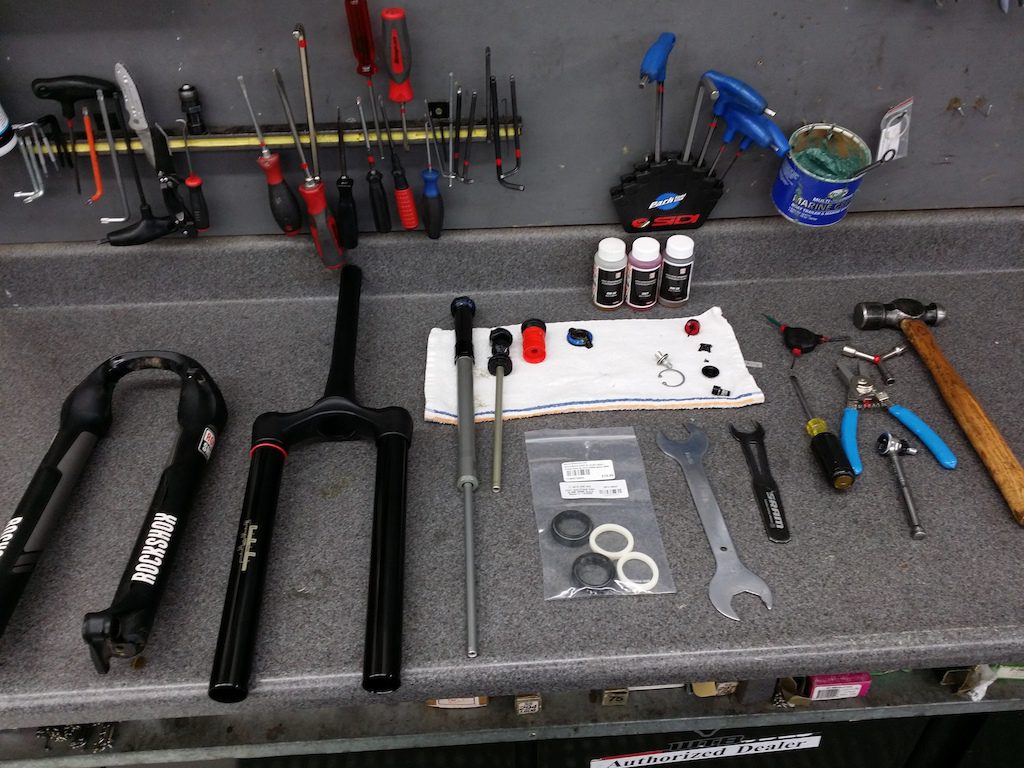
As with cleaning your wipers above the first thing, you’ll want to to give your bike a good clean before you start on this. If you don’t, you risk getting bits of dirt where you don’t want bits of dirt. You’ll need a few tools for this, and some will change depending on the manufacturer of your forks, always give your owner’s manual a read.
The tools you’ll need
- An Allen key set
- A rubber mallet
- Some clean cloths, rags will do
- Lower lube
- Measuring syringe
- The correct grease, only a tiny amount
- Possibly new seals and foams
- A clean workbench
- A small vise
- An old container
Now that list of tools and items needed might seem scary, but in reality, if you go slowly and work methodically, you’ll be pretty safe. The first thing you’ll need to do is to remove your fork from your bike. If you don’t know how to do this, it might be worth learning some basic mechanics before taking your suspension to pieces.
- Now that your forks are out and clean, you’ll need to remove the rebound adjuster. You can either pull this out by hand, or you’ll need to remove a clip to do so. Your owner’s manual will tell you which version you have
- Then use the vice to hold your forks, clamp it using the steerer, and keep the fork horizontal
- Lower your foot nuts, do not take them all the way out
- Give the foot nuts a tap with your rubber mallet. You are trying to separate the stanchions from the lowers here, so you don’t need to be bashing anything full force. Once you’ve done, this, remove the foot nuts and put them somewhere safe
- You should be able to pull the lower legs off now. Drain the lower lube into your old container. You’ll need to dispose of this according to your local area regulations
- Take one of your cloths and run it through the lowers to make sure you’ve removed all the oil
- If you need to replace your seals and foams, we will do that now. Remove the wiper seals from your forks do this slowly and carefully
- Remove the old seals and foams
- Give your foams a good soaking in lube. It’ll make your forks feel so much better later. Slowly push them in
- Slowly push your seals in, don’t rush as you’ll more than likely damage the lip on the seals. Apply a tiny bit of grease
- Slide your lower legs back onto the stanchions, don’t push them all the way on yet
- Dig out your owner’s manual again and find out how much lube you need. Get your measuring syringe and pour in the correct amount
- Move your fork to a slight angle in the vice. Otherwise, the lube will pour over you
- Squirt the lube into the holes at the bottom of the fork legs
- Get your foot nuts and line them up with spring shafts and damper. Replace any crush washers and tighten your foot nuts back up
- Refit your rebound adjuster
- Fit the fork back on your bike.
Looking after your air can

Again this is a little easier than you think. You’ll need the following tools.
- Soft jaw vise
- An Allen key set
- A shock pump
- The correct lubrication (see your owners manual)
- A clean cloth
- Your bike should be clean.
- Remove the shock from your bike and then remove the mounts from the body end of your shock.
- Place your air can in the soft jaw vice. Use the end mount beside the can and not at the end of the stanchion.
- Let the air out.
- Slowly unscrew the air can form its threads.
- Now the fun bit. You’ll want to pull the air can from the body. It can feel like it is stuck on, but that is just the air pressure. It’ll come but don’t let it take you by surprise.
- Get your cloth and give the seals a good clean.
- Apply your lube to the body and shaft of the shock.
- Side the air can on and carefully line it up with the threads. You’ll have the air pressure trying to stop this happening. Don’t rush and take your time.
- You can now screw the can up. DO NOT use any tools to do this.
- Pump your shock up.
- Refit to your bike.